| ƒ-stop = | lens focal length |
| aperture diameter |
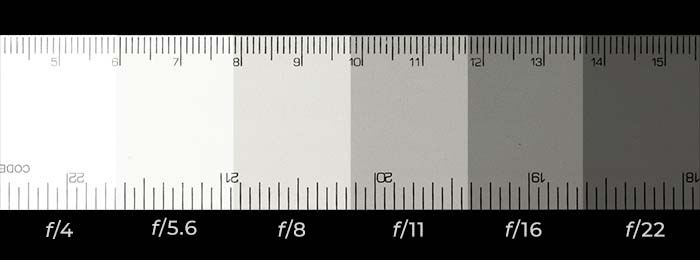
You don’t really need to remember the definition of ƒ‐stop. The important fact is that the larger the ƒ‐stop, the smaller the aperture, and therefore the darker the exposure. One full ƒ‐stop is a doubling (or halving) of the area of the aperture, and therefore a doubling (or halving) of the exposure. Since the circular area of the aperture doubles when the diameter is multiplied by √2 (which is ≈1.4), each full ƒ‐stop is a factor of 1.4 larger or smaller. ƒ/5.6 is a full stop smaller than ƒ/4 (5.6 = 4 × 1.4), and lets in half the light. In this composite image a steel ruler was photographed with different ƒ‐stops while all other settings were the same. Though in this case ƒ/8 gave a good exposure, that was entirely dependent on the lighting and other camera settings.
A typical lens might offer ƒ‐stops from about ƒ/4 to ƒ/22 — a range of five stops. Most modern lenses allow finer adjustments than full stops, for example allowing settings in 1/2 or 1/3 stop increments.
You might hear a lens referred to as being fast. That means the aperture can be opened very wide, such as ƒ/1.8, or even wider. The wide aperture lets in more light, allowing a faster shutter speed. This feature can be useful in situations with limited light. However, aside from fast lenses costing more, wide aperture settings aren't always useful for scientific applications. I'll explain this in the next section.
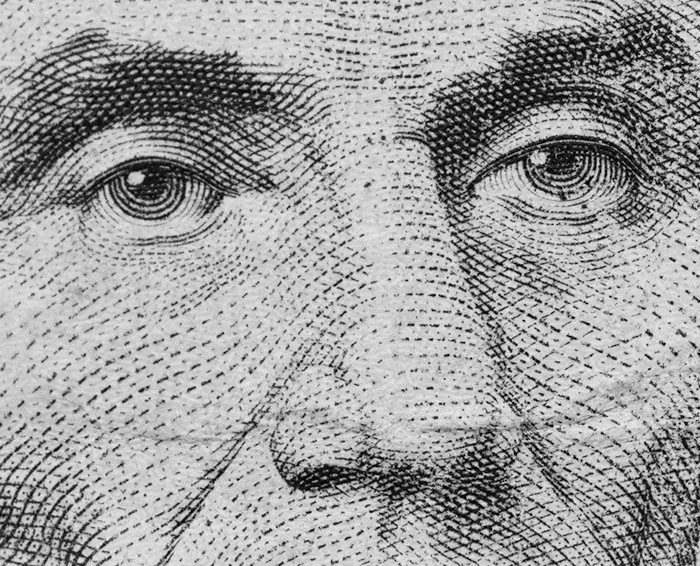
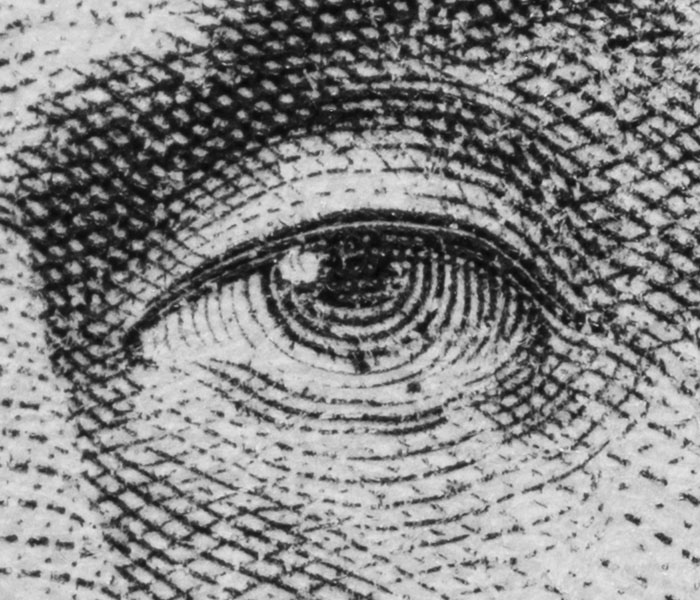
The following images are close‐ups of the face of Abraham Lincoln on a $5 bill that is not lying flat. Click on the image to switch between the two versions — one at ƒ/2.8, and the other at ƒ/10. You can see that the eye on the left is out of the depth of field at ƒ/2.8.

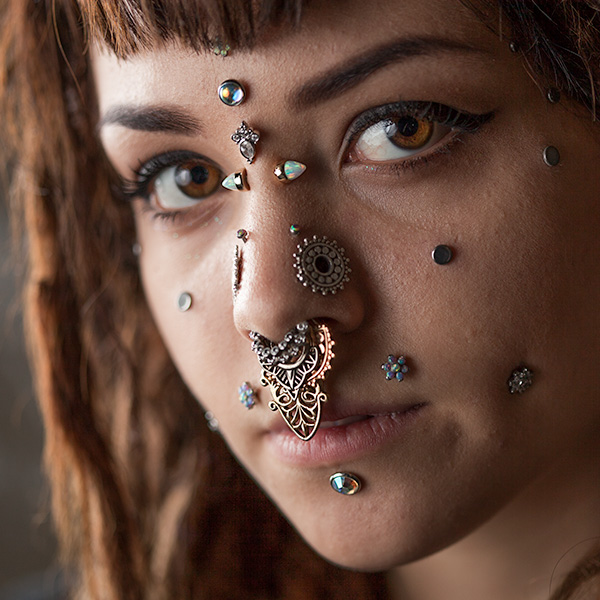
For scientific purposes, a deep depth of field is typically a priority. However, in other fields of photography, a shallower depth of field is sometimes used to blur the background so that it will not distract from the main subject of the photograph. For example, in portraiture, it’s not unusual to use a very wide aperture for a very shallow depth of field, so only the plane of the face is in focus. In this close‐up portrait, the aperture was set to ƒ/2.8 to direct the viewer’s attention to the near eye and the jewelry.

| wide aperture (small ƒ number) |
narrow aperture (large ƒ number) |
|---|---|
| brighter exposure | darker exposure |
| allows faster shutter (and/or lower ISO) | requires slower shutter (and/or higher ISO) |
| shallower depth of field | deeper depth of field |
| no diffraction softening | diffraction softening (noticeable above ƒ/16) |
Though you won't be looking up this information in anticipation of each shot, it’s worth spending a few minutes acquainting yourself with results for your most common photographing situations so you’ll have a feel for good settings.
Disclaimer: The calculator makes many assumptions; note how I slipped in “acceptably sharp” about the calculated result. The camera and lens designs affect the depth of field, as does the size of the displayed image, the viewing distance from the monitor or the print, and the visual acuity of the viewer. I’ve tested online depth of field calculators on various sites, and they sometimes give very different results depending on the assumptions they make.